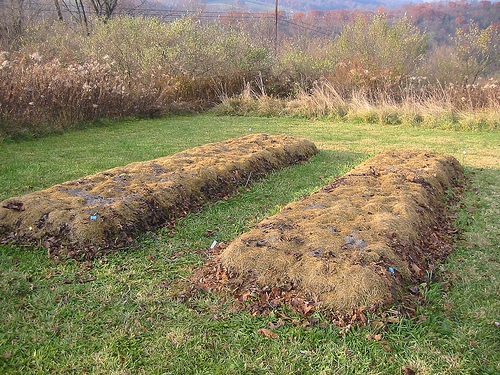
Whether you call it sheet composting, sheet mulching, lasagna gardening or no-till gardening, all names refer to a method of building a garden bed by adding layers of organic material that will break down over the rainy winter months. The technique involves mowing lawn or cutting leafy weeds close, smothering them with newspaper or cardboard, and then adding layers of compost and wood chips or straw. With moderate effort, you will have fluffy garden beds for your seeds and transplants come spring. Best of all, if you are diligent, your new beds will be weed free.
Sheet mulching is also the easiest way to transform lawn into productive garden space. The Bay-Friendly Landscape & Gardening Coalition has clear, simple directions at www.loseyourlawn.org. A new or rejuvenated bed can be a small project or a total yard changer. It is up to you.
To start, identify and mark the dimensions of your new bed. Remember to flag your irrigation heads so you can retrofit later for drip irrigation.
Mow, knock down or cut tall weeds, old vegetable plants, cover crops or grasses at ground level and lay them flat on the ground. This step does not apply to invasive plants like Bermuda grass, oxalis, blackberries or horsetail. If you have tenacious weeds like those, you will have to dig them out and eradicate them any way you can. Otherwise you will be creating weed heaven and will likely never get rid of them.
At this point, University of California Cooperative Extension sheet-composting specialists recommend checking the pH of your soil, adjusting it with amendments, and giving the new bed one initial tilling to break up the soil and mix in any necessary amendments. If you do till, this will be the last time. Now water the bed well to start microbial action and decomposition in your soil.
Cut an edge along the lawn or bed to avoid run off and keep mulch from spilling onto your pavement or walkway after you build your layered beds. Use a flat-edged shovel to clear an 8- to 12-inch-wide zone at the edge of your walks. The soil height in this zone should be at least three inches lower than the pavement or walkway surface.
If you have leftover sod and soil from the edging, you can create mounds in your beds. Mounds can create visual interest and are great for plants that need good drainage.
Now you can plant any large plants in five-gallon containers. Follow directions from your nursery for size and depth of the planting hole. If you get large plants in the ground now and surround them with weed barrier, compost and mulch, these plants will be protected from weeds, and the bed will be protected from the turmoil of deep digging the next season.
The next layer of lasagna is the weed barrier. You can use burlap or recycled natural-fiber fabric, although most gardeners use newspaper or recycled cardboard. Do not use plastic weed-barrier cloth or anything impermeable as you want water and nutrients to reach your soil.
Be generous when laying the weed barrier. A whole section of newspaper is better than a single page. Overlap the material if necessary to cover the bed completely. Tear or cut the barrier as needed to fit it around plants that you want to keep. The goal is to keep out any sunlight, since sunlight will encourage the weeds or lawn you have just buried to pop right back out. When you have finished, water the material until it is soaked.
You have three layers now: soil, weeds and weed barrier. Next, add a layer of compost. If you don't make your own, you can buy some from the local waste-management company. Use one to three inches of compost to provide nutrients and a planting medium for small plants (in 4-inch pots or smaller) in the first season.
Finally, complete your lasagna with three to five inches of mulch. This top layer is intended to mimic the organic matter in a forest, so appropriate materials would include chipped tree prunings, leaves or clean, weed-free straw from your local feed store. Keep mulch a few inches away from tree trunks and plant stems to prevent rot and rodent problems. Give everything a good soaking to make sure there are no dry pockets. Dry cardboard laid in fall will still be dry cardboard in spring if you do not give it a good, soggy kick start.
If we have normal rain this fall and winter, your bed will be ready to plant in just a few months. If we have a long dry spell, remember to water it to keep the microbial action going. You will be rewarded in the spring with a fertile growing space.
Workshop:Napa County Master Gardeners will conduct a workshop on “Creating Wreaths from Your Garden” on Sunday, December 7, from 2 p.m. to 4 p.m., at the Yountville Community Center, 6516 Washington Street, Yountville. Learn which plants from your garden make good wreaths. Learn how to choose and prepare plant materials, and tips and tricks for designing and making easy wreaths for the holidays or other times of the year. Participants will create their own wreath to take home. To register, call the Parks & Recreation Department at 707-944-8712 or visit its website.
Master Gardeners are volunteers who help the University of California reach the gardening public with home gardening information. Napa County Master Gardeners ( http://ucanr.org/ucmgnapa/) are available to answer gardening questions in person or by phone, Monday, Wednesday and Friday, 9 a.m. to Noon, at the U. C. Cooperative Extension office, 1710 Soscol Avenue, Suite 4, Napa, 707-253-4143, or from outside City of Napa toll-free at 877-279-3065. Or e-mail your garden questions by following the guidelines on our web site. Click on Napa, then on Have Garden Questions? Find us on Facebook under UC Master Gardeners of Napa County.