By Mel Kendall
February is downtime in my garden. I have done all my fall pruning and some spring pruning and cleanup. The garden is slumbering and looks pretty rough. While I can prune some plants, I really shouldn't mess with others, even though they look like they need the most care. Frost has decimated them, but experience has taught me that if I'm patient, most of them will come back when it warms in late April to early May. If I relax and leave the damaged foliage on the plants, the frost burnt leaves will protect the main plant from further damage. I will have to look at their soggy mushiness and force myself to be patient for a while, so I'll look for productive things to occupy my time.

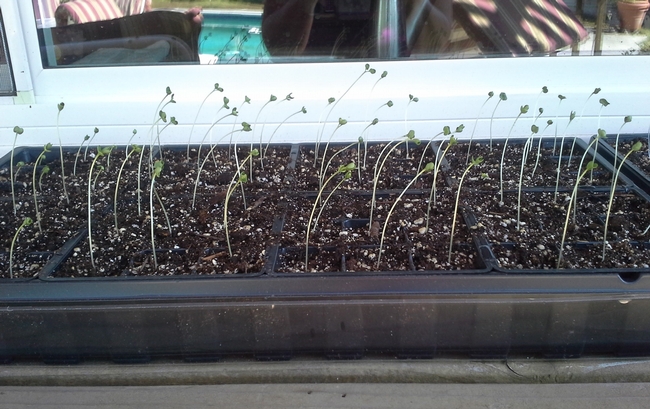
Previously, my indoor seed starting efforts had had mixed results. Once there wasn't enough light, and I had tall spindly sprouts that were just not strong enough to be transplanted. Last year I was completely skunked — not one seed sprouted. I decided to read the instructions!

-
A SCHEDULE. Timing is important. Refer to the Sonoma County Master Gardener “Vegetable Planting Summary” for details on planting dozens of vegetables.
My Comment: I have included a link to the Sacramento County Master Gardener “Flower seed Planting Summary” for details on planting dozens of flower seeds. The chart covers the timing for starting summer color plant seeds both indoors and out.
-
VIABLE SEEDS. Seeds have a shelf life as well as ideal storage requirements.
My comment: Nature is amazing with all the potential that is stored in any tiny little plant seed. Seeds have been found that are hundreds of years old that are still viable. But, check the date of each seed packet. Every seed packet is marked with a “packaged on date,” which is a good way for determining their viability. As an example, most annual flowers like zinnias or cosmos have a one-year window for the best chance of germination.
-
GROWING MEDIA. Commercial potting soils provide proper water filtration and aeration. Avoid filling pots with native soil that becomes compacted and often contains pathogens.
My comment: I have found that just plain potting soil is fine for seed starting, but my best results have come from using a commercial seed starting soil blend.
Note: Michigan State University Extension tells us the difference between potting soil and seed-starting mix. "Soilless seed-starting mixes have a finer texture and are made from ingredients such as milled peat moss, perlite, coconut coir fiber and vermiculite. Although potting soils may be used to start seeds, they tend to have a more coarse texture and may contain field soil, compost or composted manure along with vermiculite, peat moss or perlite. Some seed-starting or potting mixes may contain fertilizer as an additive. Read the package. Some products contain enough fertilizer to provide seedlings with sufficient nutrients to last up to three months, while others may have no added nutrients ..."
-
CONTAINERS should be clean and sterilized to eliminate risk of diseases. Wash all containers thoroughly and soak and rinse in a solution of 1 part chlorine bleach to 9 parts water, to help prevent diseases from occurring to your delicate seedlings. Air dry.
My comment: I save containers and it seems that they multiply alarmingly. Now, I find my best results have been to toss the used containers and purchase seed trays each year. Peat pots are biodegrade in the soil and are a great way to avoid adding to the landfill.
-
PLANTING DEPTH. Follow directions on seed packets for planting depth information, usually 2-4 times the diameter of the seed. Very fine seeds may be lightly pressed into the medium and watered in with a mister.
My comment: I insert the eraser end of a pencil into the soil to get the desired depth for each seed. Gently dimpling the soil for seeds that need shallow insertion and with force for those that need deeper holes.
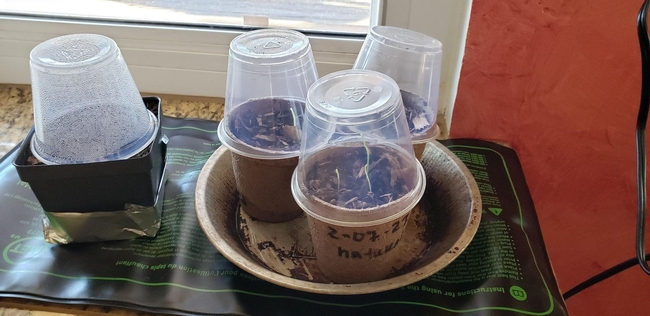
Note: After I plant the seeds I then cover each seed tray with a ‘greenhouse' dome. This is either included with the purchased seed tray set-up, or I use plastic wrap held up by toothpicks (a pain to re-install each time after watering). My best solution so far has been to use inverted clear plastic drink cups. These are easily removed and replaced when watering and are reusable.
-
WATERING. After seeding, keep the soil moist but not wet. Use a mister so as not to displace the seeds or place containers in a tray with one-inch of warm water in the bottom and, when saturated, set the containers aside to drain. Don't let containers sit in water constantly or the soil may become too wet and the seeds will rot.
My comment: I purchased a neat little watering head online that fits right on the end of a plastic water bottle. When the plastic bottle is compressed a gentle ‘rain shower' is distributed evenly over the soil and new seedlings. It's easy to store, plus I feel somewhat virtuous in reusing plastic water bottles.
-
LIGHT REQUIREMENTS. Once seeds germinate, place pots in a south-facing window or under fluorescent tubes or special grow lights. Plants need 16 hours each day under lights but soil dries out fast; be sure to keep the soil evenly moist. Once seedlings are well-established and develop a second set of true leaves, fertilize them with a half-strength, soluble plant fertilizer solution.
My comment: I have had problems with not enough light and had tall spindly seedlings that just weren't viable as a result. One year, I put the trays in the sun but covered them with the greenhouse top thinking that they would get cold otherwise. When I returned later that day the plastic seed tray had actually melted in some spots and I'm sure I totally solarized the poor little seeds. There are grow lights to purchase, but I haven't tried those yet. I'm still working on the perfect light solution.
-
TEMPERATURE. Seedlings should be placed in a location that is about 65-70 degrees during the day and 55-60 degrees at night. Many gardeners use a heat mat set with a timer.
My comment: This year for the first time I tried a heat mat. My seeds germinated in record time! In doing research before my purchase, I found that a heat mat with a timer wasn't really needed because seeds should receive even, constant temperatures until germination.
My next concern is when, exactly, I should remove the seedlings from the heat source and take off the greenhouse dome? I'm still exploring information about this.
-
HARDENING OFF. About 2 weeks before transplanting to the garden, harden off young plants by exposing them to lower outdoor temperatures and humidity as well as slightly reducing water. Many gardeners move plants to an outdoor cold frame or shaded outdoor area during the day and bring them in at night for a week, then leave them outdoors for another week before transplanting seedlings into a sunny site.
My comment: I have done this with great success. I have a shelf under a southwest facing window that I put my little seedlings on. For the first week, I put them out during the day for a few hours and bring them in at night. Then, I leave them out overnight.
-
TRANSFERING INTO THE GARDEN. In general, plant seedlings at the same depth they were in the planting tray.
My comment: Once my seedlings have had their days in the greater environment I plant them directly in the soil. The planting beds have been prepared at least a month prior by clearing any weeds and debris, with added compost to break up and prepare the soil for my cute little babies. The watering schedule depends on the weather. Regular water is needed as you don't want to let the new seedlings dry out. If it doesn't rain, keep your seedlings moist, not soggy, by hand watering until they get settled in. As the plants mature, water as requirements designate.
At the writing of this article, I have Sweet pea and Zinnia seeds growing on a heat mat under the inverted clear drinking glasses. Both types of seeds have germinated within 3 days. I attribute this fast germination to the heat mat and greenhouse inverted clear drinking cups. This exercise is very satisfying and keeps me busy. It will keep from going out in the garden and messing around, to the detriment of my existing landscape.
Napa Master Gardeners are available to answer garden questions by email: mastergardeners@countyofnapa.org. or phone at 707-253-4143. Volunteers will get back to you after they research answers to your questions.
Visit our website: napamg.ucanr.edu to find answers to all of your horticultural questions.
Photo credits: Mel Kendall
Reference links:
Michigan State Univ. Extension: Potting soil vs. seed starting soil mix
UC California Garden Web: seed starting https://cagardenweb.ucanr.edu/Vegetables/?uid=9&ds=462
UCMG Sonoma County-seed starting https://sonomamg.ucanr.edu/Food_Gardening/Additional_KG_Articles/Seeding_Annuals_for_Early_Bloom/
UCMG Sac. County-Flower seed planting chart https://sacmg.ucanr.edu/Flowers/
UCMG Napa County Food Growing Forum-video https://youtu.be/LBgql_LU4rs